Docker Security
19/Jun 2016
DockerCon 2016 is here and this is the very first day with workshops on various topics. I chose to attend the Docker Security workshop as I’m interested in seeing how Docker tackles some security challenges. This blog post is my notes taken from the workshop.
In order to talk about security, we first have to know how docker works on a higher level to know what to secure. The workshop addresses that question early on. Container security is different from, say, securing a hypervisor, since they work differently. Docker is essentially an abstraction layer on top of namespaces and cgroups so we have to talk about security in those contexts. On a higher level, namespaces govern what a container can see, and cgroups govern what a container can use.
Docker Internals
Namespaces
When forking a child process on Linux, you can specify what system resource is shared from the parent process and what is “unshared”, and the “unshared” resource becomes the namespace isolation provided by the kernel to the process. Such resources are:
* mount
* UTS
* IPC
* network
* pid
* cgroup
* user
See man unshare for more detailed description.
What this means is changes made within a namespace by a process isn’t visible to other processes outside of the namespace, which effectively provided process isolation, and made a docker container appears to be like a virtual machine on the surface.
Namespaces appear as files under /proc/<pid>/ns folder, e.g.,
# ls -l /proc/1/ns
total 0
lrwxrwxrwx 1 root root 0 Jun 28 03:56 cgroup -> cgroup:[4026531835]
lrwxrwxrwx 1 root root 0 Jun 28 03:56 ipc -> ipc:[4026532440]
lrwxrwxrwx 1 root root 0 Jun 28 03:56 mnt -> mnt:[4026532438]
lrwxrwxrwx 1 root root 0 Jun 28 03:56 net -> net:[4026532443]
lrwxrwxrwx 1 root root 0 Jun 28 03:56 pid -> pid:[4026532441]
lrwxrwxrwx 1 root root 0 Jun 28 03:56 uts -> uts:[4026532439]
and if you are within a container, can you find out the container id by querying /proc/1/cgroup file, which lists the name of the namespaces.
Cgroups
cgroups, or control groups is a kernel feature that provides resource tracking and limitations for a group of tasks. In docker terms, the docker daemon creates and assigns a cgroup for each running container, and you can set what resource container is able to get, e.g., CPU, memory or pid limits.
e.g., docker run takes:
--cpuset-cpus: CPUs in which to allow execution--cpuset-mems: MEMs in which to allow execution--memory-reservation: Memory soft limit--pids-limit: Tune container pids limit
Docker names the cgroup it creates using the container id, so a handy way to find out the container id within the container is to inspect /proc/1/cgroup file in the container:
root@48b83d3621b5:/proc/1# cat cgroup
9:pids:/docker/48b83d3621b5c176b22885e799e73f2cec6e14d821c83b2ecb4fc73324212631
8:cpu,cpuacct:/docker/48b83d3621b5c176b22885e799e73f2cec6e14d821c83b2ecb4fc73324212631
7:net_cls:/docker/48b83d3621b5c176b22885e799e73f2cec6e14d821c83b2ecb4fc73324212631
6:devices:/docker/48b83d3621b5c176b22885e799e73f2cec6e14d821c83b2ecb4fc73324212631
5:memory:/docker/48b83d3621b5c176b22885e799e73f2cec6e14d821c83b2ecb4fc73324212631
4:blkio:/docker/48b83d3621b5c176b22885e799e73f2cec6e14d821c83b2ecb4fc73324212631
3:freezer:/docker/48b83d3621b5c176b22885e799e73f2cec6e14d821c83b2ecb4fc73324212631
2:cpuset:/docker/48b83d3621b5c176b22885e799e73f2cec6e14d821c83b2ecb4fc73324212631
1:name=systemd:/docker/48b83d3621b5c176b22885e799e73f2cec6e14d821c83b2ecb4fc73324212631
Here the container id is 48b83....
Docker Security Best Practices
Secure the Containers
Use minimal base images
In a secured environment, every image you build has to come from a known and trusted source. The minimal the base image, the narrower the attack surface is going to be. Alpine Linux has gain significantly in popularity as it’s a very minimal Linux distribution. I personally build almost everything from Alpine when I can. The caveat is it’s built using musl libc instead of the ubiquitous glibc so your mileage may vary depending on how your code or your dependency rely on specifics of glibc.
Verify content
In order to build the chain of trust, we want to know where our software dependencies come from when building the image. Different package management systems have ways to verify the authenticity and integrity of the packages you want to install. For example, when using apt-get to install software from 3rd party source, always obtain it from the official channel and verify the keys.
RUN apt-key adv \
    --keyserver hkp://keyserver.ubuntu.com:80 \
    --recv-keys ... \
    && echo deb http://repository.example.com stable non-free \
    | tee /etc/apt/sources.list.d/example.list
Create read-only containers/volumes
By default, docker run ... creates and runs a container in read-write mode. The process in the container is able to write to the root file system of the container. According to the security principle of least privilege, if you don’t expect the container process to write to the disk, you should run the container with --read-only flag.
$ docker run -it --rm --read-only alpine sh
/ # touch foo
touch: foo: Read-only file system
Same applies to moounted volumes. If you volume mount a folder from the host not for persistence (e.g., for configuration), you don’t need write permission for the mapped folder. You can use -v host_dir:container_dir:ro to tell docker to mount the folder in read-only mode:
$ docker run -it --rm -v $(pwd):/content:ro alpine sh
/ # cd /content
/content # touch foo
touch: foo: Read-only file system
Networking
Use network namespaces
Containers can be “linked” by specifying --link during run. e.g., if your app container has a link to redis container, within your app container, you can use redis as the host name for the redis instance:
docker run -d --name redis redis:latest
docker run -d --name app --link redis:redis app_image
However, this is considered a bad practice with the newer docker versions. Links do not survive a container restart, so if either the redis or the app container gets restarted, the linkage is gone and hence it’s pretty brittle.
Since docker 1.9, network is a top-level concept and is now a recommended way of connecting containers.
$ docker network create test
704c22d89347f18ca1d369af02af5aa89b25a78b8fa0f243bef0978c7aa4fedf

$ docker network ls
NETWORK ID          NAME                DRIVER
ab205c46f52f        bridge              bridge
9ef569719a04        host                host
29053ecdedda        none                null
4e4f01be3f14        onebody_default     bridge
704c22d89347        test                bridge
The network test we just created is not tied to any containers. The network is its own subnet under the docker0:
$ docker network inspect test
[
    {
        "Name": "test",
		...
        "IPAM": {
			...
            "Config": [
                {
                    "Subnet": "172.19.0.0/16",
                    "Gateway": "172.19.0.1/16"
                }
            ]
        },
		...
    }
]
A container can join the network by specifying --network during runtime:
$ docker run -it --net=test --rm --name app1 alpine sh
/ # ifconfig eth0
eth0      Link encap:Ethernet  HWaddr 02:42:AC:13:00:02
          inet addr:172.19.0.2  Bcast:0.0.0.0  Mask:255.255.0.0
          inet6 addr: fe80::42:acff:fe13:2%32744/64 Scope:Link
          UP BROADCAST RUNNING MULTICAST  MTU:1500  Metric:1
          RX packets:71 errors:0 dropped:0 overruns:0 frame:0
          TX packets:9 errors:0 dropped:0 overruns:0 carrier:0
          collisions:0 txqueuelen:0
          RX bytes:9084 (8.8 KiB)  TX bytes:738 (738.0 B)
You can see the container is assigned an IP address in the subnet. Let’s run another container in the network, and take a look at the network:
$ docker network inspect test
[
    {
        ...
        "Containers": {
            "aac7e82e2b89fc021606541ec46bd11b734bc4fd97296b2f343d622e8ccb6a49": {
                "Name": "stupefied_albattani",
                "EndpointID": "5213b7177348929fae12273c4ed6df6c5894bcfeef246b3fd6ee81789533153e",
                "MacAddress": "02:42:ac:13:00:03",
                "IPv4Address": "172.19.0.3/16",
                "IPv6Address": ""
            },
            "e2d5d159dc1cbb1f671c01286138704128bbbf6f9c428605155dbe8b7df4de1f": {
                "Name": "app1",
                "EndpointID": "b8fb80f16e8b9d4ec53707fce4d7e49fc901b82f0d727d280fc859684cce1056",
                "MacAddress": "02:42:ac:13:00:02",
                "IPv4Address": "172.19.0.2/16",
                "IPv6Address": ""
            }
        },
        ...
    }
]
The name associated with the containers are accessible to other containers in the network:
$ docker run -it --rm --net=test alpine sh
/ # ping app1
PING app1 (172.19.0.2): 56 data bytes
64 bytes from 172.19.0.2: seq=0 ttl=64 time=0.378 ms
64 bytes from 172.19.0.2: seq=1 ttl=64 time=0.193 ms
64 bytes from 172.19.0.2: seq=2 ttl=64 time=0.294 ms
64 bytes from 172.19.0.2: seq=3 ttl=64 time=0.200 ms
However, if you start a container outside of the test network, none of the containers are going to be accessible:
$ docker run -it --rm --name outsider alpine sh
/ # ping app1
ping: bad address 'app1'
/ # ping 172.19.0.2
PING 172.19.0.2 (172.19.0.2): 56 data bytes
^C
--- 172.19.0.2 ping statistics ---
4 packets transmitted, 0 packets received, 100% packet loss
/ #
Be cautious with --net=host
I have to confess that I’m guilty of this :) When I have container connectivity issues, I slap on --net=host on docker run and everything just worked. This is a bad security practice as called out during the workshop. Because --net=host puts the container in the same network namespace as the host, the container can see all traffic on the host:
$ docker run -it --net=host alpine sh
/ # ip a
1: lo: <LOOPBACK,UP,LOWER_UP> mtu 65536 qdisc noqueue state UNKNOWN qlen 1
    link/loopback 00:00:00:00:00:00 brd 00:00:00:00:00:00
    inet 127.0.0.1/8 scope host lo
       valid_lft forever preferred_lft forever
    inet6 ::1/128 scope host
       valid_lft forever preferred_lft forever
2: wlp1s0: <BROADCAST,MULTICAST,UP,LOWER_UP> mtu 1500 qdisc mq state UP qlen 1000
    link/ether c8:ff:28:62:80:29 brd ff:ff:ff:ff:ff:ff
    inet 192.168.1.132/24 brd 192.168.1.255 scope global dynamic wlp1s0
       valid_lft 78812sec preferred_lft 78812sec
    inet 192.168.1.125/24 brd 192.168.1.255 scope global secondary wlp1s0
       valid_lft forever preferred_lft forever
    inet6 fe80::2475:8b1:aafd:3dde/64 scope link
       valid_lft forever preferred_lft forever
4: docker0: <NO-CARRIER,BROADCAST,MULTICAST,UP> mtu 1500 qdisc noqueue state DOWN
    link/ether 02:42:c8:75:9f:71 brd ff:ff:ff:ff:ff:ff
    inet 172.17.0.3/16 scope global docker0
       valid_lft forever preferred_lft forever
    inet6 fe80::42:c8ff:fe75:9f71/64 scope link
       valid_lft forever preferred_lft forever
As demonstrated above, all interfaces on the host is visible inside the container.
Be cautious with exposed ports
When you’re connecting containers together with network namespace, you don’t need to bind the container port to the host port with the -p option. Exposed ports may create conflict with port bindings on the host. However, if your container is the entrypoint to your web app, then I can’t think of a specific reason not to use port binding, since otherwise, you will have to setup iptable rules to route traffic from the host interface to container IP.
User Management
root in the container is root on the host by default. I discovered this hack that exploits read/write mount and root user in the container. Consider this:
$ docker run --rm alpine whoami
root

$ docker run --rm alpine id
uid=0(root) gid=0(root) groups=0(root),1(bin),2(daemon),3(sys),4(adm),6(disk),10(wheel),11(floppy),20(dialout),26(tape),27(video)
and you can do more damaging things like:
docker run -v /:/mnt alpine rm -rf /mnt # DON'T RUN THIS!
Run as non-privileged user
Since Docker 1.7, you can provide -u|--user to run command to run the container as a specific user:
$ docker run -u 1000:1000 --rm -v /:/mnt alpine id
uid=1000 gid=1000
Now the cuser in the container doesn’t have the root privileges:
$ docker run -u 1000:1000 --rm -v /:/mnt alpine rm -rf /mnt/bin/sh
rm: can't remove '/mnt/bin/sh': Permission denied
Use user namespace remapping
Since Docker 1.10, Docker added support for user namespace for the docker daemon. With this feature, the container is able to run with the root user inside the container but an unprivileged user on the host.
Let’s see an example. To activate it, we need to rerun the docker daemon with --userns-remap option.
First, stop docker daemon:
systemctl stop docker.service
User namespace uses two config files /etc/subuid and /etc/subgid. See full description using man subuid and man subgid.
Touch these files:
touch /etc/subuid && touch /etc/subgid
Run docker daemon:
$ sudo docker daemon --userns-remap=default
[...]
INFO[0001] User namespaces: ID ranges will be mapped to subuid/subgid ranges of: dockremap:dockremap
As you can see, user namespaces have been activated. Furthermore:
$ cat /etc/subuid
dockremap:100000:65536

$ cat /etc/subgid
dockremap:100000:65536
What this means is the dockremap user is allocated a block of 65536 user/group ids. Container started henceforth will be using user root in the container, but to the host, it’s going to be user dockremap’s subordinate users.
Unfortunately, this feature requires the kernel to be compiled with user namespaces turned on. Most distributions don’t ship with this kernel config by default. Moreover, there have been security vulnerabilities related to user namespaces which hampers mainstream adoption.
Another caveat about user namespace is once the daemon is run with --userns-remap, the images pulled previously pulled by the daemon without the flag are going to be pulled again, since the permissioning on the file system layers are no longer valid. So, if you decide to use user namespace remap in production, do it early on and do not switch back and forth.
Image Distribution
The security goals are image provenance and trust. Provenance verifies the publisher of the image whereas trust verifies the integrity of the image.
Pull by digest (as oppose to by tag)
Pulling images by tag name is surely convenient, but tags do not guarantee integrity. The same tag may not refer to the same image. This is surely the case when the tag name is latest, as it always points to the latest image being pushed in the repository. Other named tags are not immutable either, since one can always untag (through docker rmi) and re-tag and push image to change the image being pointed by the tag.
Alternatively, pull by digest to ensure integrity and immutability. The repo digest is shown to you when you push an image to a registry:
# running the registry
# docker run -p 5000:5000 -v ~/registry:/var/lib/registry --name=registry registry:2  # only works with registry version 2

# building an image...
# docker build -t localhost:5000/test .

# push the image
$ docker push localhost:5000/test
The push refers to a repository [localhost:5000/test]
6102f0d2ad33: Pushed
latest: digest: sha256:04298820c9063b955614868b5cb2d60be91a3d7c560e0d6c377b0c3add764504 size: 528
We can subsequently pull the image using the digest:
$ docker pull localhost:5000/test@sha256:04298820c9063b955614868b5cb2d60be91a3d7c560e0d6c377b0c3add764504
sha256:04298820c9063b955614868b5cb2d60be91a3d7c560e0d6c377b0c3add764504: Pulling from test
Digest: sha256:04298820c9063b955614868b5cb2d60be91a3d7c560e0d6c377b0c3add764504
Status: Downloaded newer image for localhost:5000/test@sha256:04298820c9063b955614868b5cb2d60be91a3d7c560e0d6c377b0c3add764504
This works well for registries you do control. However, I haven’t found an easy way to find out the repo disgest for images hosted on the official docker hub, unless I’m missing something glaringly obvious, this sort of defeats the purpose if the official docker hub doesn’t make pulling by digest easy for users.
Content Trust
When pulling
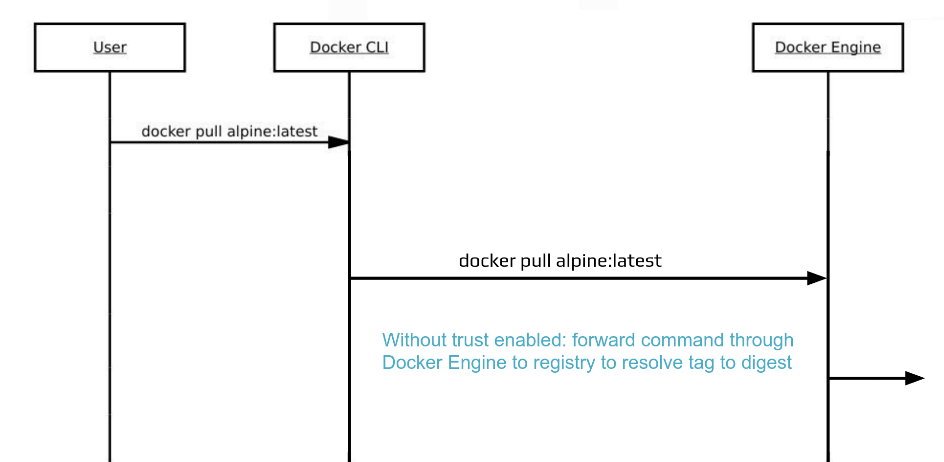
Docker 1.10 added content trust, which adds a layer of trust between the docker CLI and engine when pulling and pushing images. To enable it, set DOCKER_CONTENT_TRUST to 1.
When DOCKER_CONTENT_TRUST is not set, what docker pull does is like the following (diagram provided by the workshop)
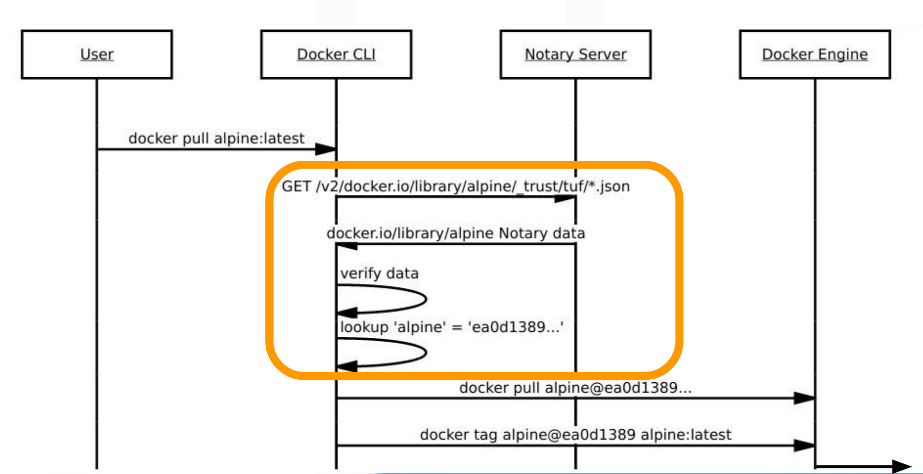
When content trust is turned on, what happens behind the scene is a notary server is contacted by the docker CLI, which responds with notary data for the CLI to verify, and when everything is checked out, the CLI obtains a repo digest, and asks the docker engine for the image given the repo digest. See the figure below. See the following diagram (provided by the workshop)
When pushing
Same as pulling, you set DOCKER_CONTENT_TRUST to 1 and docker push as usual. The difference is the metadata of the repo is signed by your key that you register with the notary service.
Let’s see it in action. First let’s pull an official image:
$ docker pull alpine
Using default tag: latest
Pull (1 of 1): alpine:latest@sha256:3dcdb92d7432d56604d4545cbd324b14e647b313626d99b889d0626de158f73a
sha256:3dcdb92d7432d56604d4545cbd324b14e647b313626d99b889d0626de158f73a: Pulling from library/alpine
Tag it with my repo:
$ docker tag kevinjqiu/alpine-test:trusted
Push the image to my docker hub account:
$ docker push kevinjqiu/alpine-test:trusted
The push refers to a repository [docker.io/kevinjqiu/alpine-test]
4fe15f8d0ae6: Layer already exists
trusted: digest: sha256:3dcdb92d7432d56604d4545cbd324b14e647b313626d99b889d0626de158f73a size: 506
Signing and pushing trust metadata
You are about to create a new root signing key passphrase. This passphrase
will be used to protect the most sensitive key in your signing system. Please
choose a long, complex passphrase and be careful to keep the password and the
key file itself secure and backed up. It is highly recommended that you use a
password manager to generate the passphrase and keep it safe. There will be no
way to recover this key. You can find the key in your config directory.
Enter passphrase for new root key with ID 80375a3:
Repeat passphrase for new root key with ID 80375a3:
Enter passphrase for new repository key with ID bb34875 (docker.io/kevinjqiu/alpine-test):
Repeat passphrase for new repository key with ID bb34875 (docker.io/kevinjqiu/alpine-test):
Finished initializing "docker.io/kevinjqiu/alpine-test"
Successfully signed "docker.io/kevinjqiu/alpine-test":trusted
As this is the first time I’m pushing an image with CONTENT_TRUST set, it prompts me for a passphrase to sign a generated root key, and then a passphrase to sign the key used with the repo I’m pushing to (in this case, kevinjqiu/alpine-test).
The generated keys will be stored under $HOME/.docker/trust/private/root_keys and $HOME/.docker/trust/tuf_keys/ folders.
Docker Security Scanning
Docker security scanning (Nautilus) is a service provided by Docker Inc that routinely scan your file system layers for known security vulnerabilities (from CVE database). It also performs binary scan on statically linked binaries.
It’s worth noting that it’s not the only solution out there. There are a few other vendors at DockerCon that provide container security.
Capabilities, seccomp and Linux Security Modules
Now we’re in the more hardcore territory of Linux security and is frankly beyond my understanding of Linux. However, the advice given by the workshop is an easy one: use the default, and do not give more privilege than that’s required.
Do not run container with –privileged…
Root user on the container by default doesn’t get all the capabilities granted by the kernel. See man capabilities for a list of capabilities. By default, docker container’s root user gets about a dozen capabilities. You can add or remove capabilities during runtime by specifying --cap-add or --cap-drop.
It’s worth pointing out that capabilities only apply to root users. If a container is run with --user, then --cap-add or --cap-drop don’t apply, since non-root users don’t have capabilities.
--privileged gives a root user all capabilities, so unless you know what you’re doing, don’t do it. For docker development, it’s recommended that you run the development container in privileged mode, but in general, there’s never a reason to run with --privileged on production, since it gives ALL privileges.