Run Your Own Home DNS on coredns
18/Apr 2018
I have been running my home DNS on a pair of RaspberryPi’s for some time now. The main reason for running my own DNS server is to utilize the excellent pihole project to block 3rd-party ads from being served to my home network.
I ansiblized the config files. It has been running great for a couple of months.
Recently, I have acquired an orangepi, a RaspberryPi 3 and a new desktop. Together with my 10+ year old Thinkpad T60p that serves as my home server, my main laptop, and my two original RaspberryPi’s, there are way too many IP addresses for me to remember if I need to ssh into them. This is when the idea of hosting a home DNS zone came to me. What if I can ssh monarch.srv.qiu.home (srv for “server”)? I also run many services on my home server including Emby for media streaming, Prometheus and Grafana for monitoring/alerting and graphing server stats, and a celery job that downloads my bank statements periodically, and a CouchDB server that the transactions from the bank statements are being saved to. Eventually I want to be able to address these services by domain name instead of IP+port, e.g., emby.svc.qiu.home or couchdb.svc.qiu.home. I will likely have to add a DNS entry svc.qiu.home (svc for “service”) for my home server running a load balancer / proxy (I’m thinking of using traefik) and use virtual host to proxy these services but that’s for another day. Today, I’m just going to setup a hosted zone for .srv.qiu.home.
One obvious choice is to add those host name and domain name mappings to /etc/hosts file of the DNS servers (my two raspberypi’s), but what fun would that be? Also, setting up a hosted zone with the zone’s SOA (start of authority) pointing to my own server would allow me to later migrate my DNS to the cloud so I can recursively resolve .srv.qiu.home using the public DNS server. Not that I plan to splash the cash to acquire .qiu.home domain, but the know-how is what’s important and I do have a handful of domains that I could potentially use.
Another obvious choice is to piggy-back on pihole to let pihole aware of the zone. Pihole is built on top of dnsmasq. I’m not an expert on dnsmasq (or dns for that matter), but after some searching around, it doesn’t look like dnsmasq supports serving your own zone file. Most tutorials online use
Now I came to the conclusion that I need to setup a separate DNS server to serve the zone, and forward queries for other domain names to the pihole servers. Most online tutorials use bind9. I followed the excellent tutorial on digitalocean and it worked nicely. I ansiblized the bind9 solution and everything seems to fall in place.
However, in my last year of immersion in the cloud and kubernetes space, I heard a lot of buzz around coredns. CoreDNS is written in Golang and based on Caddy. I wanted to see if I can implement the same DNS zone using coredns, and hence this blog post is born.
CoreDNS
As mentioned, CoreDNS is a new DNS server implementation written in Golang. Starting in Kubernetes 1.9+, CoreDNS replaced kube-dns (which is based on dnsmasq) to be the DNS solution inside a Kubernetes cluster.
Just like Caddy, CoreDNS is designed to be extensible with plugins. Having native support for Prometheus is a big plus, which means I can hook it into my existing Prometheus infrastructure for monitoring, alerting and dashboarding.
The Big Picture
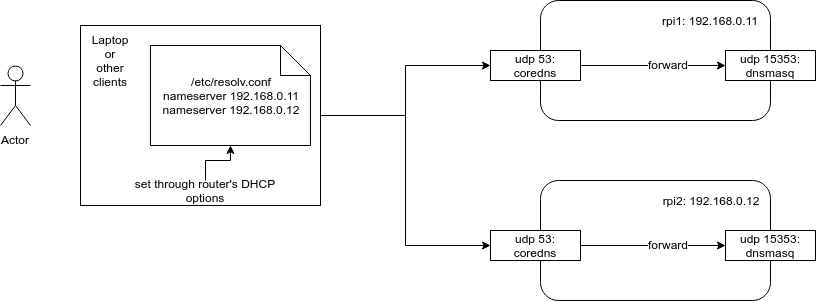
The Big Picture
We instruct the router to set client’s resolver to the RaspberryPi’s IP addresses. The .0.11 is used as the primary resolver and .0.12 is the secondary. Clients (meaning computers/laptops/cell phones/tablets) connected to the router through DHCP are assigned an ip address and given the RaspberryPi’s IP addresses as the resolvers.
We don’t want to lose the ability to filter ads, so I kept the pihole dnsmasq service but only to run it on a different port. Then using query forwarding, I can instruct CoreDNS to forward any queries it doesn’t handle to the upstream resolver, which is the pihole dnsmasq service in this case.
Getting Started
Download the CoreDNS binary for your platform. For first generation RaspberryPi, it’s simply arm (https://github.com/coredns/coredns/releases/tag/v1.1.1). Then extract it to somewhere on your $PATH. Now, invoke coredns and chances are you will see:
$ ./coredns
2018/04/19 04:16:34 listen tcp :53: bind: permission denied
That’s because it tries to bind to port 53 (the standard DNS port) using an unprivileged user. We’ll deal with that later. For now, let’s run it on a different port for testing.
Barebone Corefile
Here’s the simplest Corefile:
.:65353 {
    log
    errors
}
.:5353tells CoreDNS where it should bind itself to. In this case, port 5353 on all interfaces.logis the logging plugin, which logs DNS queries requested.errorsenables error logging.
Now, run coredns:
$ coredns
.:65353
2018/04/19 04:25:53 [INFO] CoreDNS-1.1.1
2018/04/19 04:25:53 [INFO] linux/arm, go1.10, 231c2c0e
CoreDNS-1.1.1
linux/arm, go1.10, 231c2c0e
Now it’s serving DNS requests on port 65353. Let’s try it out using dig:
$ dig @192.168.0.12 -p 65353 google.com

; <<>> DiG 9.10.3-P4-Ubuntu <<>> @192.168.0.12 -p 65353 google.com
; (1 server found)
;; global options: +cmd
;; Got answer:
;; ->>HEADER<<- opcode: QUERY, status: SERVFAIL, id: 10678
;; flags: qr rd; QUERY: 1, ANSWER: 0, AUTHORITY: 0, ADDITIONAL: 1
;; WARNING: recursion requested but not available

;; OPT PSEUDOSECTION:
; EDNS: version: 0, flags:; udp: 4096
;; QUESTION SECTION:
;google.com.                    IN      A

;; Query time: 3 msec
;; SERVER: 192.168.0.12#65353(192.168.0.12)
;; WHEN: Thu Apr 19 00:27:06 EDT 2018
;; MSG SIZE  rcvd: 39
There’s no answer! Well, duh, we haven’t setup any zone files or forwards so right now this DNS server is next to useless.
This is confirmed by the CoreDNS logs:
192.168.0.10:35488 - [19/Apr/2018:04:27:06 +0000] 10678 "A IN google.com. udp 40 false 4096" SERVFAIL qr,rd 40 1.830937ms
19/Apr/2018:04:27:06 +0000 [ERROR 0 google.com. A] plugin/log: no next plugin found
Setup Forwarding
To make it semi-useful, we can forward queries to the pihole dnsmasq service, so after this step, the CoreDNS service becomes essentially a proxy for the pihole’s DNS service.
.:65353 {
    log
    errors
    forward . 127.0.0.1:15353
}
We added the forward ... line using the forward plugin. 127.0.0.1:15353 is where the pihole’s dnsmasq service is.
Now, let’s resolve google.com again:
dig @192.168.0.12 -p 65353 google.com

; <<>> DiG 9.10.3-P4-Ubuntu <<>> @192.168.0.12 -p 65353 google.com
; (1 server found)
;; global options: +cmd
;; Got answer:
;; ->>HEADER<<- opcode: QUERY, status: NOERROR, id: 47361
;; flags: qr rd ra; QUERY: 1, ANSWER: 1, AUTHORITY: 0, ADDITIONAL: 1

;; OPT PSEUDOSECTION:
; EDNS: version: 0, flags:; udp: 4096
;; QUESTION SECTION:
;google.com.                    IN      A

;; ANSWER SECTION:
google.com.             12      IN      A       172.217.2.110

;; Query time: 13 msec
;; SERVER: 192.168.0.12#65353(192.168.0.12)
;; WHEN: Thu Apr 19 00:32:44 EDT 2018
;; MSG SIZE  rcvd: 55
Voila! A simple DNS proxy is up and running.
Setup Hosted Zone
Now it’s the meat of this experiment - setting up a hosted zone .srv.qiu.home. We have a couple of options. We can use the file plugin that allows serving the zone from RFC 1035 style zone files. Alternatively, we can setup an etcd cluster and use the etcd plugin to read zone data from the etcd cluster. I opted for the file plugin because I happen to have the zone files on hand when setting up bind9 (which also uses RFC 1035 zone file format) and setting up and maintaining an etcd cluster is probably a fight for another day. I do like the promise of using an external data store for zone records though, since I don’t have to manually update the zone files when a new host is available.
Bind9 has a nice template for the zone file, which is what I used as a starting point. Create a file named db.$YOUR_ZONE_DOMAIN, in my case, it’s db.srv.qiu.home.
First, define a SOA record.
$TTL    604800
@    IN    SOA    ns1.srv.qiu.home. admin.srv.qiu.home. (
                  3        ; Serial
             604800        ; Refresh
              86400        ; Retry
            2419200        ; Expire
             604800 )    ; Negative Cache TTL
;
SOA stands for “start of authority”. It’s a record the resolvers use to lookup a name recursively. It’s basically saying “any subdomain under .srv.qiu.home, ask ns1.srv.qiu.home to resolve its ip please”. I left the rest of the parameters as is from the bind9 template.
Next, we define the NS records for the authoritative name server:
; name servers - NS records
@    IN    NS    ns1
@    IN    NS    ns2
This is basically saying when a NS query is issued (to find out what the authoritative name server for the zone is), use the provided DNS servers, which are ns1.srv.qiu.home and ns2.srv.qiu.home.
Now, we need to define the A (address) records for ns1 and ns2:
; name servers - A records
ns1.srv.qiu.home.    IN    A    192.168.0.11
ns2.srv.qiu.home.    IN    A    192.168.0.12
Finally, we can enumerate the name / ip mapping in the form of A records for the rest of the hosts on our network:
; 192.168.0.0/16 - A records
monarch.srv.qiu.home.    IN    A    192.168.200.61
idaeus.srv.qiu.home.     IN    A    192.168.0.11
nivalis.srv.qiu.home.    IN    A    192.168.0.12
...
Now, go back to the Corefile. We need to let CoreDNS know the zone file:
.:65353 {
    ...
    file zones/db.srv.qiu.home srv.qiu.home
}
The first argument of file is the path to the zone file, and the second is the domain name of the zone. Restart CoreDNS and let’s try to resolve a host in the .srv.qiu.home domain:
dig @192.168.0.12 -p 65353 monarch.srv.qiu.home

; <<>> DiG 9.10.3-P4-Ubuntu <<>> @192.168.0.12 -p 65353 monarch.srv.qiu.home
; (1 server found)
;; global options: +cmd
;; Got answer:
;; ->>HEADER<<- opcode: QUERY, status: NOERROR, id: 14036
;; flags: qr aa rd ra; QUERY: 1, ANSWER: 1, AUTHORITY: 2, ADDITIONAL: 1

;; OPT PSEUDOSECTION:
; EDNS: version: 0, flags:; udp: 4096
;; QUESTION SECTION:
;monarch.srv.qiu.home.          IN      A

;; ANSWER SECTION:
monarch.srv.qiu.home.   604800  IN      A       192.168.200.61

;; AUTHORITY SECTION:
srv.qiu.home.           604800  IN      NS      ns1.srv.qiu.home.
srv.qiu.home.           604800  IN      NS      ns2.srv.qiu.home.

;; Query time: 3 msec
;; SERVER: 192.168.0.12#65353(192.168.0.12)
;; WHEN: Thu Apr 19 00:56:42 EDT 2018
;; MSG SIZE  rcvd: 101
Success!
Setup Reverse Records
Our job is done upon completion of the previous step. However, to make a zone complete, we also need to provide a reverse mapping file so reverse lookup also works.
By reverse lookup, I mean our DNS server should be able to answer the question “what domain name is associated with the IP 192.168.200.61?” for example.
Because my home network is using 192.168.0.0/24 CIDR block, we need to create a zone file db.192.168:
$TTL    604800
@    IN    SOA    ns1.srv.qiu.home. admin.srv.qiu.home. (
                  3        ; Serial
             604800        ; Refresh
              86400        ; Retry
            2419200        ; Expire
             604800 )    ; Negative Cache TTL
;

; name servers - NS records

@   IN    NS    ns1.srv.qiu.home.

; PTR records

11.0      IN  PTR ns1.srv.qiu.home.
12.0      IN  PTR ns2.srv.qiu.home.
61.200    IN  PTR monarch.srv.qiu.home.
11.0      IN  PTR idaeus.srv.qiu.home.
12.0      IN  PTR nivalis.srv.qiu.home.
This is very similar to the forward zone file, except that instead of providing A records to map domain name to IP addresses, we use PTR records to provide the reverse functionality.
After this is created, we also have to hook it up with Corefile:
.:65353 {
    ...
    file zones/db.192.168      168.192.in-addr.arpa
}
168.192.in-addr.arpa is the reverse zone. Notice that the first two octet of our network CIDR is reversed as well (168.192). After the update, restart coredns again.
Let’s do a reverse lookup using dig:
dig -x 192.168.200.61

; <<>> DiG 9.10.3-P4-Ubuntu <<>> -x 192.168.200.61
;; global options: +cmd
;; Got answer:
;; ->>HEADER<<- opcode: QUERY, status: NOERROR, id: 47344
;; flags: qr rd ra; QUERY: 1, ANSWER: 1, AUTHORITY: 0, ADDITIONAL: 1

;; OPT PSEUDOSECTION:
; EDNS: version: 0, flags:; udp: 65494
;; QUESTION SECTION:
;61.200.168.192.in-addr.arpa.   IN      PTR

;; ANSWER SECTION:
61.200.168.192.in-addr.arpa. 604800 IN  PTR     monarch.srv.qiu.home.

;; Query time: 4 msec
;; SERVER: 127.0.0.53#53(127.0.0.53)
;; WHEN: Thu Apr 19 01:05:25 EDT 2018
;; MSG SIZE  rcvd: 90
There we go! It was able to successfully identify that monarch.srv.qiu.home is the domain name for IP address 192.168.200.61.
Ansiblization
OK, that’s basically it. However, in the spirit of infrastructure as code (and save my future headache), I had to ansiblize this process. A couple of things worth noting:
- A service unit file has to be written for CoreDNS because we’re targeting systemd
- I used an unprivileged user
corednsto run the coredns - An unprivileged user isn’t able to bind a service to port 53. I can’t hold my nose and run
corednsasroot, so thecorednsbinary needs to have the capability to bind to port 53.
If anyone is interested, the playbook role is here.
Conclusion
Having setting up the hosted zone on both bind9 and CoreDNS, I have to say CoreDNS is a lot simpler. Maybe it became simpler because I had prior experience having gone through the bind9 tutorial, but in CoreDNS, the configuration is much less than bind9. I also like the plugin system where you can pick and choose what features you want to be present in the server (e.g., I enabled Prometheus plugin so I can have my Prometheus instance monitor the health of the DNS server). The plugin system also makes it possible to have different backends. I think my next step for this project is to serve the zone records from an etcd cluster instead of a static file!